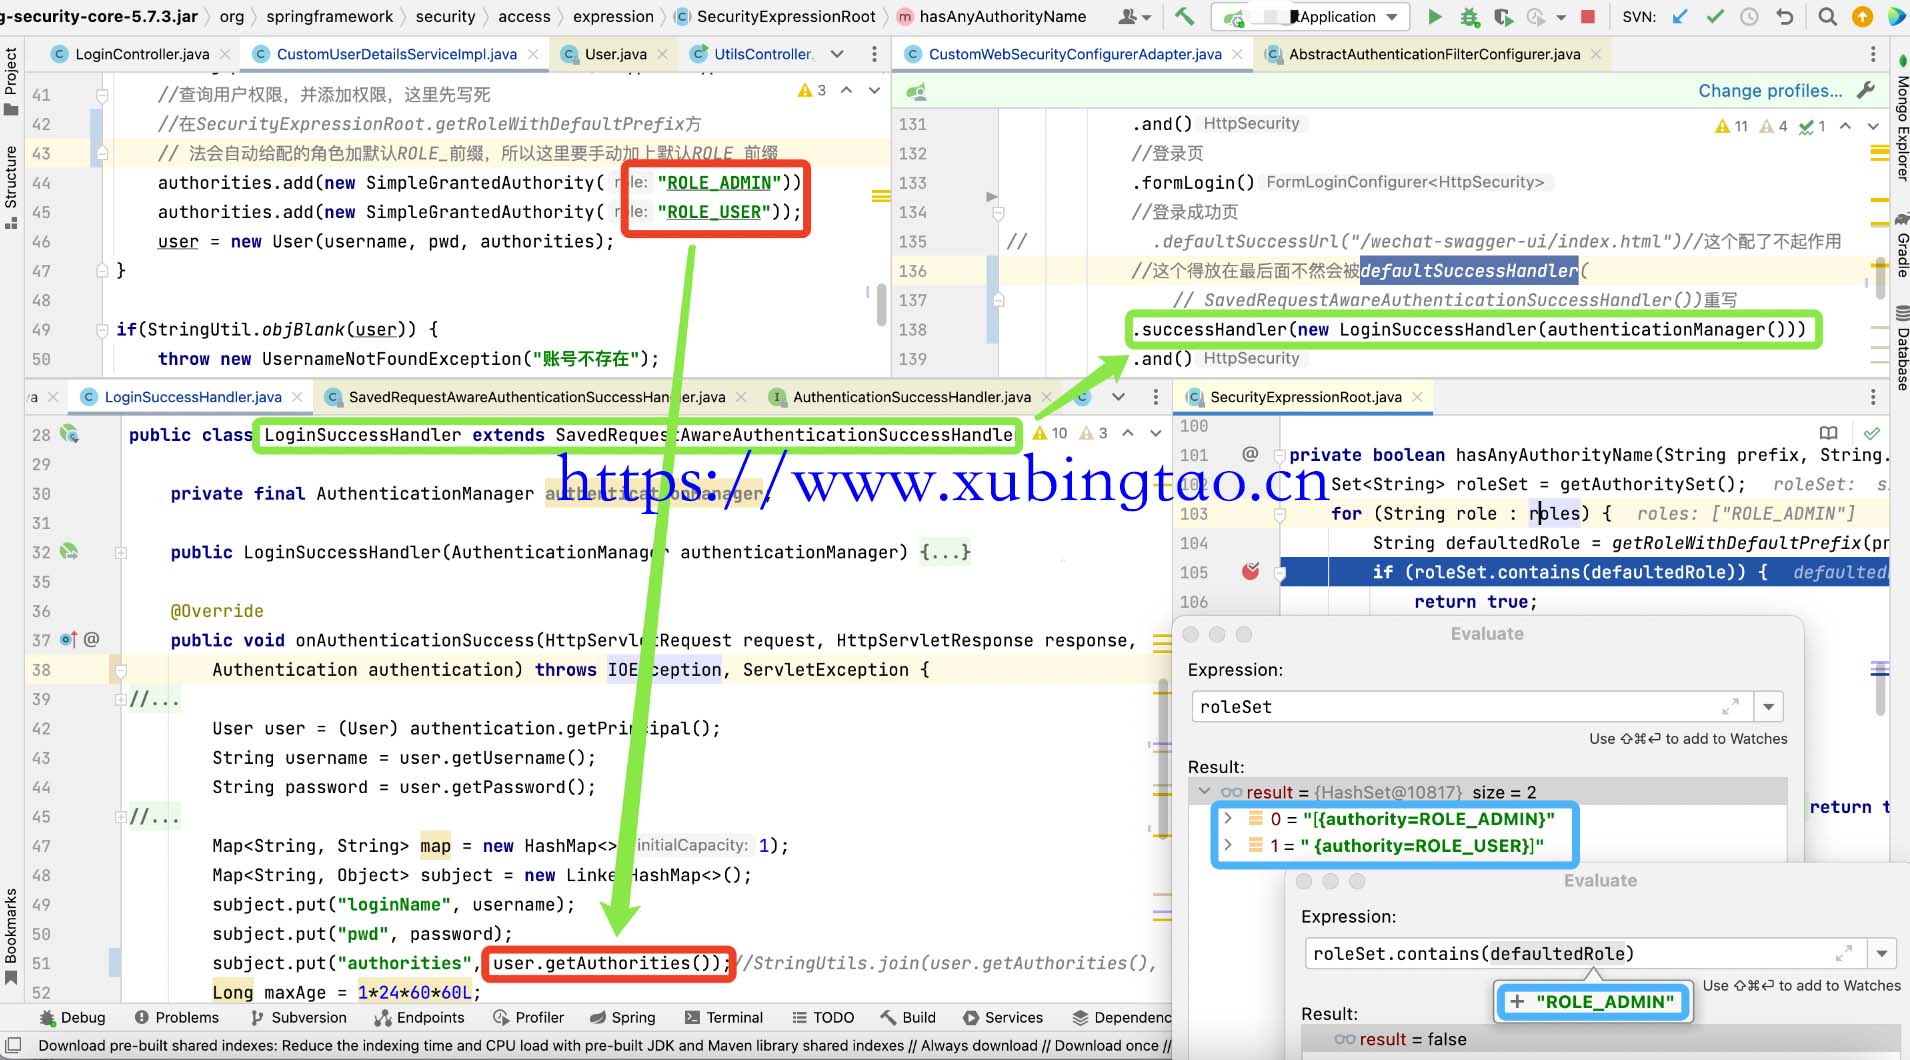
首先实现org.springframework.security.core.userdetails.UserDetailsService接口并重写loadUserByUsername方法,校验登录信息后赋权。这里的User对象直接用SpringSecurity框架的org.springframework.security.core.userdetails.User,也可以照样实现
org.springframework.security.core.userdetails.UserDetails接口自己封装。
实现org.springframework.security.web.authentication.AuthenticationSuccessHandler接口,来处理successHandler,这里直接继承org.springframework.security.web.authentication.SavedRequestAwareAuthenticationSuccessHandler,successHandler默认的处理器也是SavedRequestAwareAuthenticationSuccessHandler(需要注意的是successHandler得放在最后面,不然调半天都不会进入你的处理器,因为被defaultSuccessHandler重写了,这也是一个坑!),在onAuthenticationSuccess方法中我直接封装token,其中角色直接通过user.getAuthorities()获取在上面UserDetailsService接口设置的角色。
在controller方法头加了@PreAuthorize(“hasAnyRole(‘ROLE_DBA’, ‘ADMIN’)”)注解通过角色实现权限控制,当然首先要在通过@EnableGlobalMethodSecurity(prePostEnabled = true, securedEnabled = true)注解prePostEnabled = true开启@PreAuthorize注解。
然后就实现了权限控制,这里忽略一些无关细节。但是当我登录后访问这个接口时却,老是报“”status”: 403, “error”: “Forbidden””!
于是开启debugger排解问题,点击上面注解的hasAnyRole参数进入org.springframework.security.access.expression.SecurityExpressionRoot类的hasAnyRole方法再到hasAnyAuthorityName方法,可以看到下面这段代码就是比对角色的方法。
private boolean hasAnyAuthorityName(String prefix, String... roles) {
	Set<String> roleSet = getAuthoritySet();
	for (String role : roles) {
		String defaultedRole = getRoleWithDefaultPrefix(prefix, role);
		if (roleSet.contains(defaultedRole)) {
			return true;
		}
	}
	return false;
}
另外,这里进去getRoleWithDefaultPrefix方法可以看到方法上配的角色,不管有没有加前缀(默认是ROLE_)最后都会返回加前缀的角色字符串。
/**
 * Prefixes role with defaultRolePrefix if defaultRolePrefix is non-null and if role
 * does not already start with defaultRolePrefix.
 * @param defaultRolePrefix
 * @param role
 * @return
 */
private static String getRoleWithDefaultPrefix(String defaultRolePrefix, String role) {
	if (role == null) {
		return role;
	}
	if (defaultRolePrefix == null || defaultRolePrefix.length() == 0) {
		return role;
	}
	if (role.startsWith(defaultRolePrefix)) {
		return role;
	}
	return defaultRolePrefix + role;
}
所以我们配角色是要加上前缀,除非你通过下面的Bean把默认前缀去掉。
@Bean
GrantedAuthorityDefaults grantedAuthorityDefaults() {
    return new GrantedAuthorityDefaults(""); // Remove the ROLE_ prefix
}
通过打断点发现,最后发现在设置token时通过user.getAuthorities()获取到的竟然是“[{authority=ROLE_ADMIN}”、“ {authority=ROLE_USER}]”,可能有人会感到疑惑,我们用String的contains方法进行比较不都是其中一部分就返回true的吗?打开源码,你会发现集合容器里的contains是用(o==null ? e==null : o.equals(e))进行比较的,也就是全匹配的!所以还是要多看源码,不然会埋下很多bug的😂。
/**
 * Returns <tt>true</tt> if this set contains the specified element.
 * More formally, returns <tt>true</tt> if and only if this set
 * contains an element <tt>e</tt> such that
 * <tt>(o==null ? e==null : o.equals(e))</tt>.
 *
 * @param o element whose presence in this set is to be tested
 * @return <tt>true</tt> if this set contains the specified element
 * @throws ClassCastException if the type of the specified element
 *         is incompatible with this set
 * (<a href="Collection.html#optional-restrictions">optional</a>)
 * @throws NullPointerException if the specified element is null and this
 *         set does not permit null elements
 * (<a href="Collection.html#optional-restrictions">optional</a>)
 */
boolean contains(Object o);
当然处理这个问题也很简单,只需要在设置token的时候用org.apache.commons.lang3.StringUtils.join(user.getAuthorities(), “,”)拼接起来即可。
看我的文章你又长知识了吧,关注我的公众号为你提供更多服务,让你少走弯路,写出更健壮的代码。
展开阅读全文
上一篇: 教你如何对接微信公众号平台开发(附代码)


 扫码打开小程序可评论文章保存图片,在“我的”有实时在线客服哦,
 关注我的公众号为您分享各类有用信息
 分享录多端跨平台系统
 粤公网安备 44011202001306号