如果你还没搭好Homebrew环境了,请先去看我的《苹果电脑macOS搭brew环境》这篇文章。
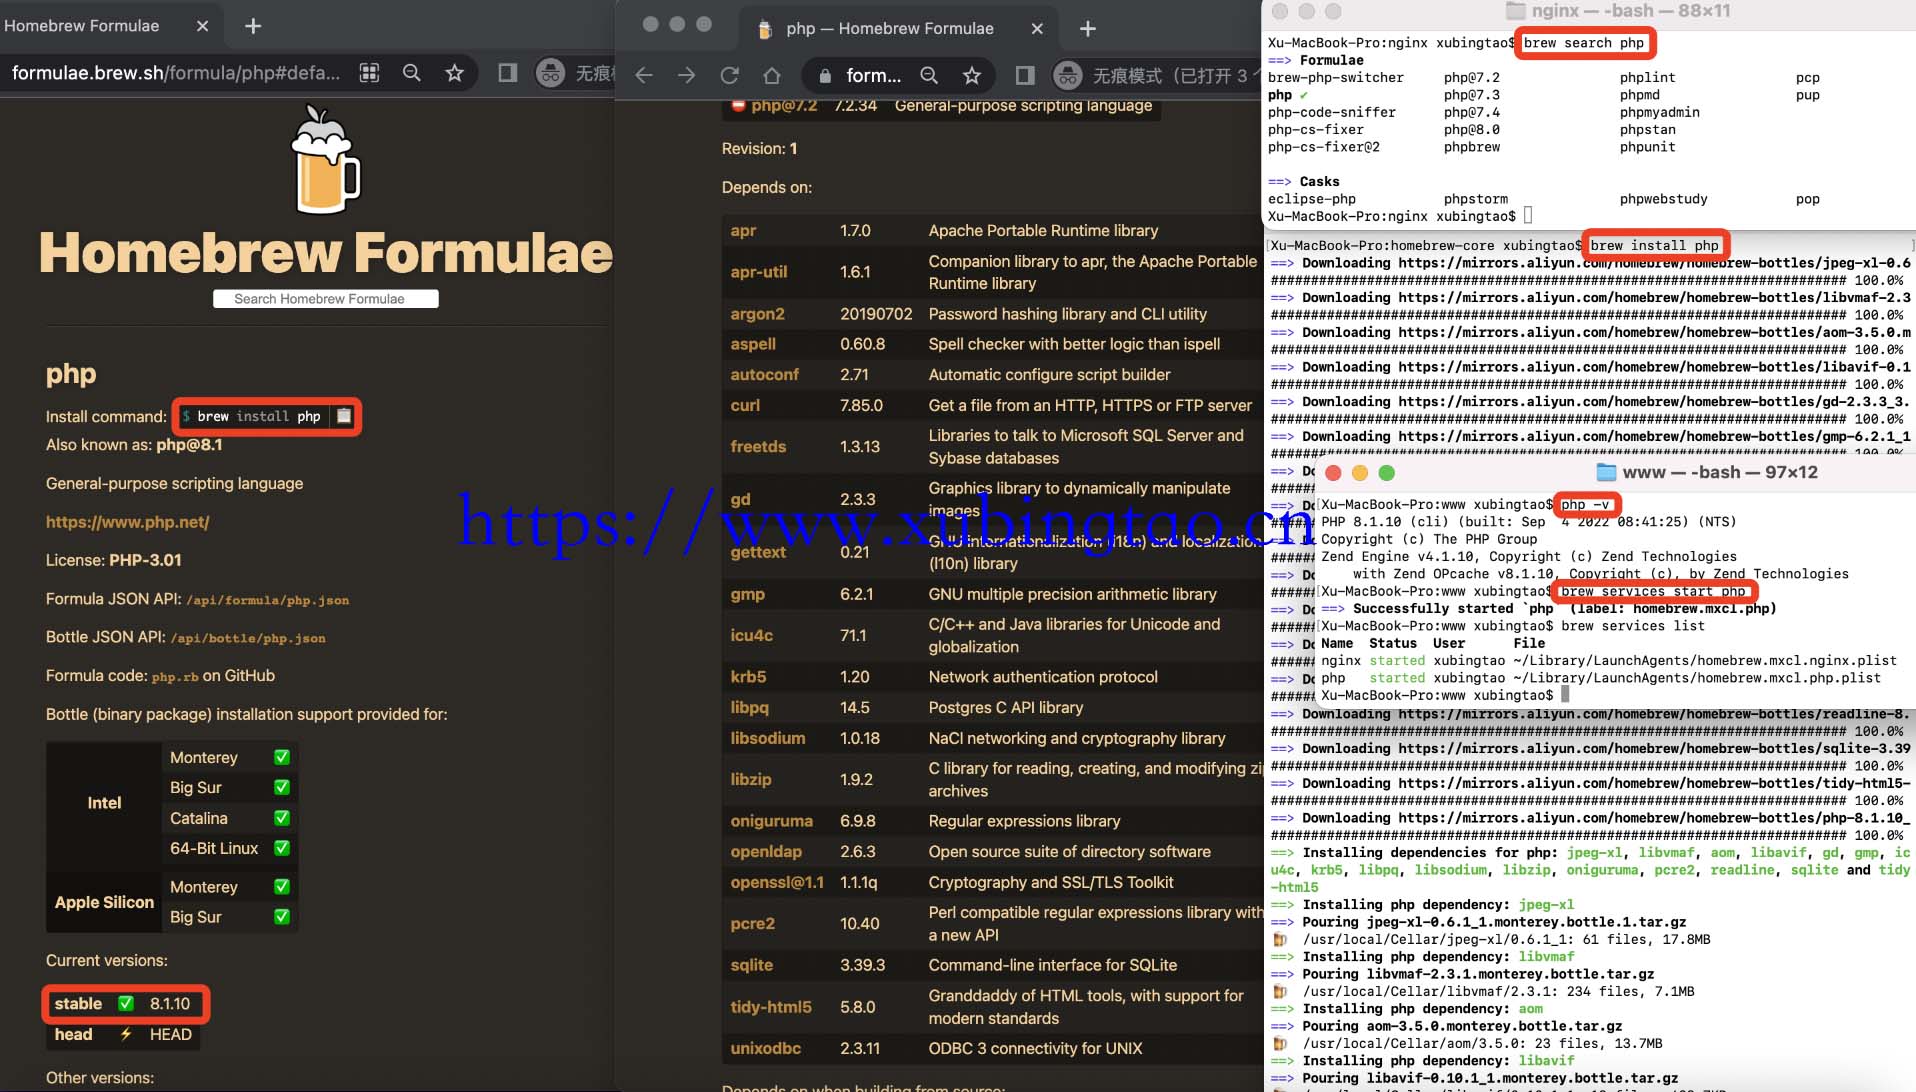
首先可以用brew search php或到Homebrew Formulae上搜索php信息,可以看到目前稳定版本是8.1.10。
接下来用brew install php安装php,然后用php -v查看版本信息,用brew services start php启动php,要关闭则用brew services stop php,重启用brew services restart php,用brew services list查看安装服务信息。

如果你可以看到PHP版本信息以及启动正常,那么PHP安装就完成了。
而nginx代理PHP其实很简单,装完PHP只要在/usr/local/etc/nginx/nginx.conf配置文件中打开下面这段注释即可,这一步可能会消耗很多人很多时间。
        location ~ \.php$ {
            root           html;
            fastcgi_pass   127.0.0.1:9000;
            fastcgi_index  index.php;
            #fastcgi_param  SCRIPT_FILENAME  /scripts$fastcgi_script_name;
            fastcgi_param  SCRIPT_FILENAME  $document_root$fastcgi_script_name;
	    include        fastcgi_params;
        }
可以看到用brew安装PHP8已经集成很多依赖库了,不像用docker安装PHP还要手动下载很多依赖库。
通常安装PHP都会搭LNMP环境,即搭建 Linux + Nginx + MySQL + PHP 的Web服务器运行环境,这里Linux环境换成了macOS,搭Nginx可以看我之前写的《Docker中安装nginx》和《在Mac上用Homebrew安装nginx》,MySQL可以看《Docker中安装MySQL》和《macOS上安装MySQL》,其中《macOS上安装MySQL》讲解了如何用dmg文件和Homebrew安装MySQL,以上这些文章足以让你搭LNMP环境了。
想搭建网站可以看我这篇文章《纯手工用Wordpress快速搭建基于Nginx+MySQL+PHP的网站》。
如果你安装PHP时出现404或者无法下载依赖文件,可以试一下用以下命令查看并修改brew源,下面把镜像源改为阿里云:
#查看brew.git当前源
cd "$(brew --repo)" && git remote -v

#查看homebrew-core.git当前源
cd "$(brew --repo homebrew/core)" && git remote -v

#修改brew.git源
git -C "$(brew --repo)" remote set-url origin https://mirrors.aliyun.com/homebrew/brew.git

#修改homebrew-core.git源
git -C "$(brew --repo homebrew/core)" remote set-url origin https://mirrors.aliyun.com/homebrew/homebrew-core.git

#zsh替换brew镜像源
echo 'export HOMEBREW_BOTTLE_DOMAIN=https://mirrors.aliyun.com/homebrew/homebrew-bottles' >> ~/.zshrc
source ~/.zshrc

#bash替换brew镜像源
echo 'export HOMEBREW_BOTTLE_DOMAIN=https://mirrors.aliyun.com/homebrew/homebrew-bottles' >> ~/.bash_profile
source ~/.bash_profile

#刷新源
brew update
修改完记得再查看一下当前源是否修改生效,或者重新打开终端。
展开阅读全文


 扫码打开小程序可评论文章保存图片,在“我的”有实时在线客服哦,
 关注我的公众号为您分享各类有用信息
 分享录多端跨平台系统
 粤公网安备 44011202001306号